需要sentry来记录前后端记录,商用的购买太贵还有限制,不划算。打算用服务器自建部署,踩了不少坑,做个记录。
基本思路,使用getsentry/onpremise的脚本安装,然后使用traefik做代理(ssl在traefik上配置)
- 环境准备:Docker 17.05.0+ Compose 1.23.0+
- clone https://github.com/getsentry/onpremise
- 进入onpremise,切换到10.0.1分支(为什么要用这个分支,因为后续的,项目使用了nginx做内部的代理,尝试了很久traefik代理nginx,都没有成功,所以就用了这个版本,以下步骤都是基于这个版本的)
- 修改配置:进入sentry文件夹
- 复制config.example.yml为config.yml,修改以下配置
- 增加 system.url-prefix: ‘https://xxxx.xxx.com’ // 这个填写你自己的sentry的域名地址
- 修改Email,sentry需要发邮件来添加用户。自己用QQ或其他邮箱,把smtp的信息获取到,对应的填写即(注意,下面mail.from必须跟username一致)
mail.backend: 'smtp'  # Use dummy if you want to disable email entirely
mail.host: 'smtp.yandex.ru'
mail.port: 587
mail.username: 'username@your.host'
mail.password: 'password'
mail.use-tls: true
# The email address to send on behalf of
mail.from: 'username@your.host'
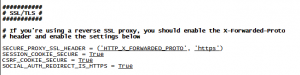
- 复制sentry.conf.example.py为sentry.conf.py,修改以下配置:(不需要http的可以跳过这步)
把SSL/TLS里的注释去掉就行
- 复制config.example.yml为config.yml,修改以下配置
- 运行安装脚本,因为安装比较慢,建议进入用screen来运行:
- screen -S sentry
- 进入onpremise文件夹
- ./install.sh
(这个步骤比较慢,可以按Ctrl+A+D,将screen放入后台运行。需要进入查看,输入命令screen -r sentry就行。 具体的可以查screen命令) - 安装完后,会提示你创建帐号,输入邮箱、密码即可
- 修改onpremise文件夹下的docker-compose.yml(下面的1和2是为了配置traefik,如果用ninx的话,代理到9000端口就行)
- 增加全局nertwork:
配置最底部,增加:
networks:
traefik_gateway:
external: true - 修改service的web,增加lables和对应需要的traefik的nertwork,我这边修改后的:(注意,ports注释掉。如果不需要https,lables的https可以去掉;如果不是deploy部署的,把下面的deploy去掉,直接用lables就行)
web:
<< : *sentry_defaults
#ports:
# – ‘9000:9000/tcp’
networks:
– default
– traefik_gateway
deploy:
labels:
– “traefik.enable=true”
– “traefik.http.services.sentry.loadbalancer.server.port=9000″# http
– “traefik.http.routers.sentry.entrypoints=web”
– “traefik.http.routers.sentry.rule=Host(`sentry.xxx.com`)”# https
– “traefik.http.routers.sentry-web-secure.tls=true”
– “traefik.http.routers.sentry-web-secure.entrypoints=web-secure”
– “traefik.http.routers.sentry-web-secure.rule=Host(`sentry.xxx.com`)” - 把配置里的image变量改为真实image地址:
- $SNUBA_IMAGE改为getsentry/snuba:latest
- $SYMBOLICATOR_IMAGE改为getsentry/symbolicator:latest
- 更新sunba的命令:
https://github.com/getsentry/onpremise/pull/434/files
- 增加全局nertwork:
- 运行docker:
- deploy:docker stack deploy -c docker-compose.yml sentry
- 非deploy:docker-compose up -d